Microsoft Blazor is a coding tool that may well be a real superhero.
Today we want to "celebrate" it by giving a gift to all the novice programmers who read us: a short introductory guide to this development framework which, for power, versatility and completeness, is probably the most popular of the moment!
Just a premise: so far we have devoted many of our articles to general IT topics and only partly to coding. This article, however, part of our regular technical column ComprESSEI, is dedicated to coding and aimed at coders. Did you receive this article by email because you subscribe to our newsletter? It may not be of interest to you. If so, don't worry: come back to the blog next week for "lighter" content, or have a look at our blog where you will certainly find articles better suited to you.
But let's get to our guide.
What exactly is Blazor?
Blazor is an open source development framework developed by Microsoft that allows developers to build interactive, dynamic web applications using the C# programming language and the .NET runtime, instead of having to rely on client-side languages such as JavaScript.
This is without doubt its greatest strength, as well as a key to its success.
Its architecture also plays a part: Blazor has a clear separation between how it calculates UI changes (app/component model) and how those changes are applied (renderer). This sets Blazor apart from other UI frameworks such as Angular or ReactJS/React Native, which can only create UIs based on web technologies. By using different renderers, Blazor can create not only web-based user interfaces but also native user interfaces for mobile devices.
In short, Blazor is probably today the main entry point for anyone who wants to approach programming seriously and professionally.
Blazor's main features include:
- Use of C#: Blazor lets developers write client-side and server-side code in C#. This means they can share code between the two environments, simplifying maintenance and reducing the risk of errors.
- Running on WebAssembly or on the server: Blazor offers two main ways of running. The first is on WebAssembly, which runs Blazor applications directly in the client's browser. The second is server-side, where the application logic runs on the server and the UI is updated dynamically on the client.
- Reusable components: Blazor follows the concept of "components", self-contained blocks of user interface. Components can be reused in different parts of the application, making it easier to build consistent, maintainable interfaces.
- Integration with .NET: since Blazor is part of the .NET ecosystem, developers can benefit from all the libraries and frameworks available in .NET, including data access, authentication, third-party services and more.
- JavaScript interoperability: Blazor offers smooth interoperability with JavaScript. Developers can call JavaScript code from C# and vice versa, making it easy to integrate existing JavaScript libraries or use browser-specific features.
- Component lifecycle: Blazor components follow a lifecycle that defines key moments such as creation, update and disposal. This lets developers manage behaviour and resources appropriately throughout the component's life.
- Built-in routing: Blazor includes a built-in routing system that makes navigation within the application easy to manage.
Blazor offers developers a complete solution for building modern web applications, ensuring consistency between client and server.
It is an interesting choice for those already familiar with .NET development who want to bring those skills to web applications. And with the recent launch of .NET 8 it has become an all-round tool, used not only "server-side" but also "client-side": practically a "full-stack web UI framework".
Step 1: install the development environment
To start developing with Blazor, first of all you need a correctly configured development environment. Here is how:
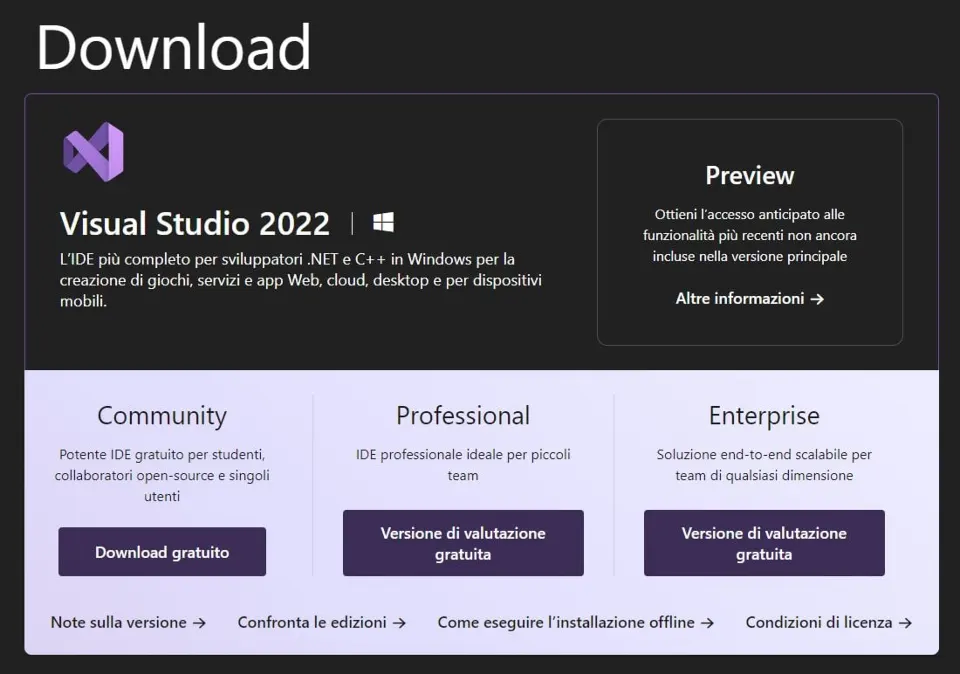
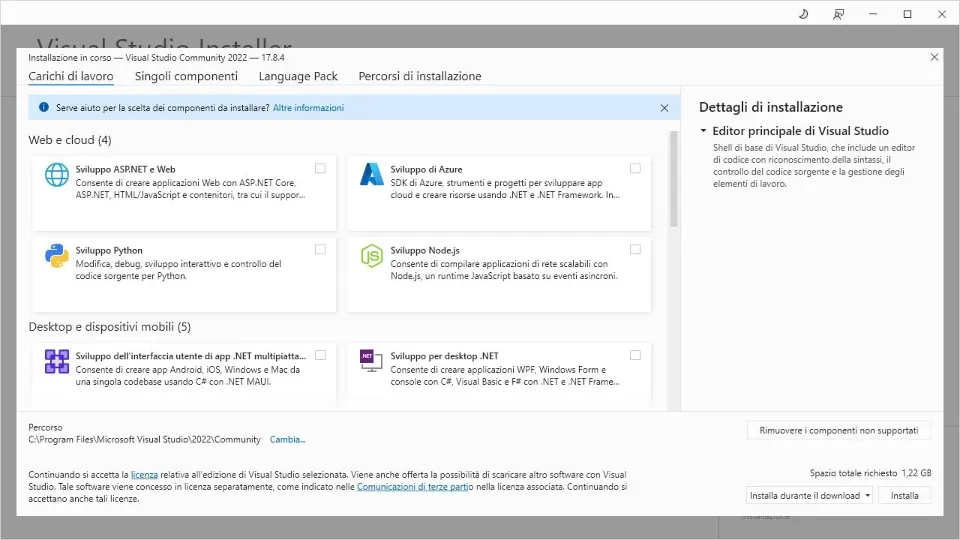
- Install Visual Studio, making sure you have the latest version. You can download the latest Visual Studio Community for free from Microsoft's official website (https://visualstudio.microsoft.com/). During installation, make sure you select the necessary workloads: select "ASP.NET and web development".
- If you prefer Visual Studio Code, make sure it is installed. You can download it from the official website (https://code.visualstudio.com/). After installing it, open Visual Studio Code and install the Blazor extension.
- .NET Core SDK setup: Blazor uses .NET Core as its runtime. Make sure you have installed the latest .NET Core SDK. You can download it from the official .NET website (https://dotnet.microsoft.com/download). Check the installation by running dotnet --version at the command prompt: you should see the current version of the .NET Core SDK.
- Blazor tools (if needed): if you installed Visual Studio, you may need to add Blazor support. Make sure you selected "ASP.NET and web development" during installation so that the necessary tools are present.
- Visual Studio Code and the Blazor extension (if needed): for Visual Studio Code, after installation, search for and install the "Blazor" extension from the Visual Studio Code marketplace.
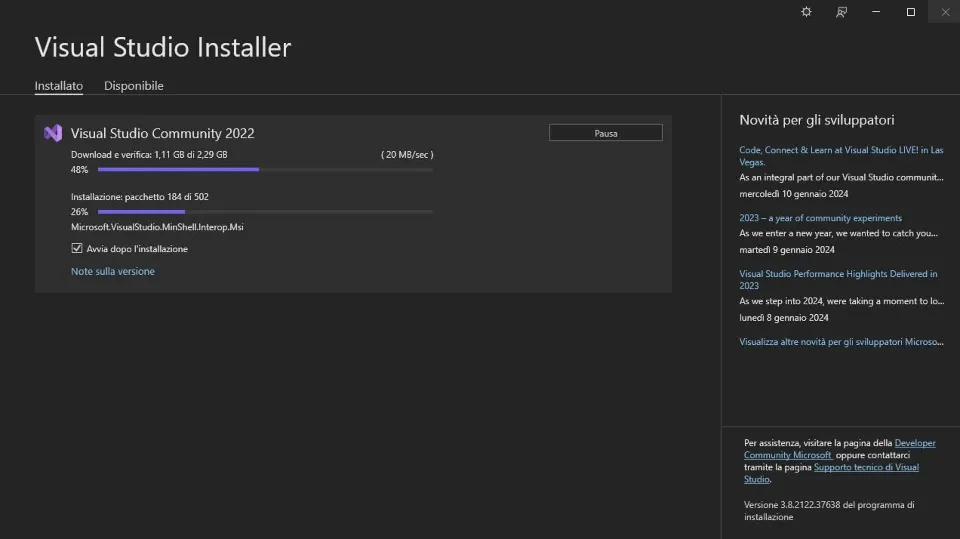
Once these steps are complete, your development environment is ready for Blazor. You can create new projects, edit code and run your Blazor applications without problems. Be sure to refer to the official Blazor and .NET documentation for updates or specific details.
Note: in this guide we use an installation of Visual Studio Community 2022 as our model (the steps are similar for other installations).
Step 2: create a new Blazor project
After installing the development environment, the next step is to create a new Blazor project.
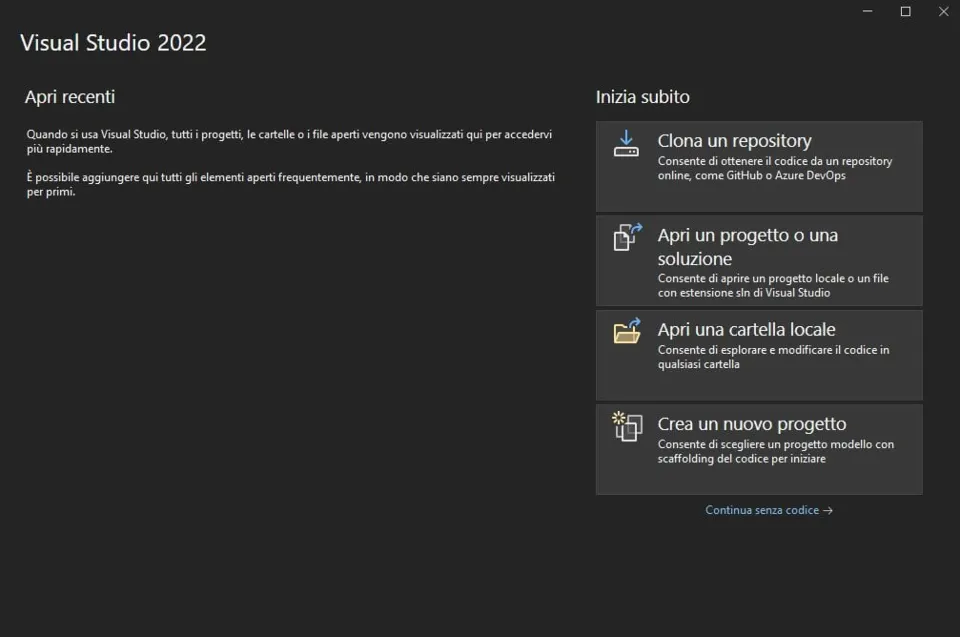
Follow these steps:
- Open Visual Studio: start Visual Studio by clicking its icon on the desktop or in the menu. If you left the "Launch after installation" option ticked, it will open by itself.
- Select "Create a new project": in the main Visual Studio window, select "File" in the menu bar, then "New" and finally "Project...".
- Choose the Blazor project type: in the new project window, search for "Blazor" in the project template search box. Then select "Blazor Web App" from the available options. You can choose between a Blazor Server and a Blazor WebAssembly application. Choose Blazor Server to start with.
- Configure the project: give your project a name in the "Project name" box and specify the location where you want to save it. You can also select the .NET version you want to use, but it is usually best to use the latest stable version.
- Select the hosting model: when you create a Blazor project you will be asked to select the hosting model. You can choose between server-side and client-side (WebAssembly). To begin with, select "Server".
- Configure additional options (if needed): you can configure further options such as HTTPS, user authentication, etc. For now you can keep the default options.
- Press "Create": after configuring your project, press the "Create" button to generate the Blazor project.
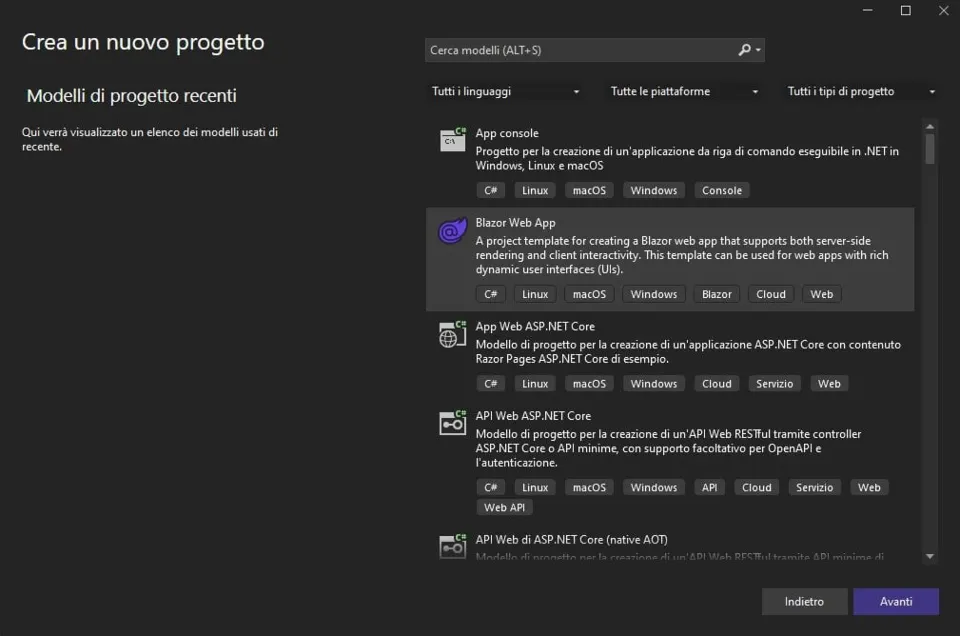
Once these steps are complete, Visual Studio will create a new Blazor project for you.
From now on you can explore the source code, edit the sample pages and start the application to see the results in the integrated browser. This is the foundation for developing with Blazor, and from here you can go on to modify it, add features and learn Blazor's features in more depth.
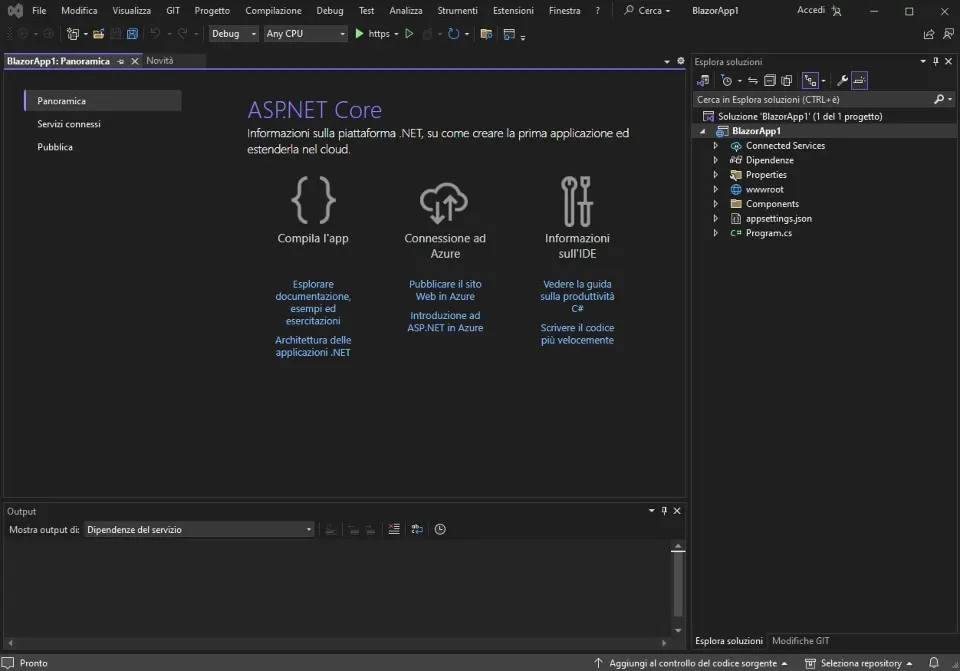
Step 3: select the hosting model
When you create a new Blazor project you need to choose the hosting model, which determines how the Blazor application will run.
Choose it according to your application's specific needs and then move on to development. The two available models offer unique advantages, so your choice will depend on your project's requirements.
We are talking about the "Server-Side" model (Blazor Server) and the "Client-Side" model (Blazor WebAssembly). Here is a short explanation of both:
- Blazor Server (server-side): in this model the Blazor application logic runs on the server and only the user interface is sent to the user's browser. User interactions and events are handled on the server, and changes are sent to the client over a real-time connection (WebSocket). This model is particularly suitable for applications that need centralised state management or when the server has to perform complex operations.
- Blazor WebAssembly (client-side): in this model the whole Blazor application runs in the user's browser using WebAssembly. The application is downloaded to the browser as a WebAssembly binary and runs there. The server is mainly used to deliver the application and back-end services. This model makes it possible to build Blazor applications that can work "offline", since all the code runs in the client's browser.
How to choose:
Select "Server-Side" if you need centralised state management, if bandwidth is a critical consideration or if you need real-time server-push communication. Choose "Client-Side" if you want to deploy the application as a static application and if your application can benefit from WebAssembly performance in the browser.
Important note: you can switch from one model to the other at later stages of development. For example, you can start with Blazor Server and move to Blazor WebAssembly if your project requires it.
Step 4: understand the project structure
After creating a new Blazor project, it is important to understand its basic structure so that you can easily move between files and resources. The structure of a Blazor project can vary depending on the chosen hosting model (server-side or client-side), but they share some common features. Here we focus on the general structure of a server-side Blazor project:
- "wwwroot" folder: contains the static files that must be directly accessible from the browser, such as CSS style sheets, JavaScript scripts, images and other static assets. For example, you may find the wwwroot/index.html file here, which is the application's main page.
- "Pages" folder: contains the application's web pages. Each Razor file (.razor) in this folder is a page of the application. For example, Pages/Index.razor is the default home page.
- "Shared" folder: here you will find shared Razor components that can be used on several pages. Razor components (.razor) are reusable parts of the user interface.
- "_Imports.razor" file: contains the import declarations for namespaces that can be used in all the application's Razor files, so you don't have to declare namespaces on every page.
- "Program.cs" file: contains the Main method that starts the application. In the server-side version it sets up the Blazor server and starts hosting.
- "Startup.cs" file: contains the application's configuration. Here you can set up services, configure authentication and define other settings.
- "wwwroot/_content" path: here you can find shared CSS, JavaScript or other assets that can be referenced in Razor pages.
- "appsettings.json" file: contains the application's configuration settings, such as database connection strings or other custom settings.
- "Pages/_ViewImports.razor" file: contains import declarations available to all the application's pages. It is similar to "_Imports.razor", but applies only to the pages in the "Pages" folder.
- Other files and folders: the project may contain further files and folders depending on your project's needs or additional libraries.
Understanding this basic structure will help you find your way around your Blazor project, so you can edit, add or remove pages, components and static resources effectively.
By exploring these files you will also start to understand how Blazor organises and manages the different parts of a web application.
Step 5: edit a page
Now that you understand the basic structure of a Blazor project, it is time to start editing a page to see how the framework works.
Follow these steps:
- Open a page: in the "Pages" folder, find a page's Razor file. For example, open Pages/Index.razor to start editing the home page.
- Edit the content: inside the Razor file you will find HTML markup mixed with C# code using Razor syntax. Change the page content as you like, for example the text of an <h1> element, or add new HTML elements.
<h1>Hello, world!</h1> <p>Welcome to my Blazor application.</p> - Add C# code: you can embed C# code directly in Razor pages. Add new variables, perform operations and use data binding to connect data to your user interface.
<p>My name is @name</p> @code { private string name = "John"; } - Run the application: save your changes and start the application, by pressing F5 in Visual Studio or by running dotnet run in the project folder from the command prompt. Open your browser and go to the local address (usually http://localhost:5000) to see your changes.
- Explore "live reload": Blazor offers live reload, which means code changes are reflected automatically in the browser without reloading the page manually.
As you make these changes, you can start experimenting with how Blazor separates code and markup, and understand data binding and how easily you can embed C# logic in web pages.
Explore the Blazor documentation further to learn about topics such as event handling, page navigation and custom components.
Step 6: use data binding
Data binding is one of Blazor's fundamental features: it simplifies the connection between C# code and the HTML user interface, letting you dynamically link data in C# to the visible parts of the UI for easy, reactive data handling.
Here is how to use data binding in Blazor:
- One-way data binding: use the @ symbol to insert C# variables directly into the HTML markup. This is called one-way data binding because the variable's value is displayed in the UI, but changes in the markup do not affect the variable:
<p>My name is @name</p> @code { private string name = "John"; } - Two-way data binding: to allow two-way changes between C# code and the UI, you can use an input element with the @bind directive. In this example, any change to the user's input is reflected in the name variable and vice versa:
<input type="text" @bind="name" /> <p>My name is @name</p> @code { private string name = "John"; } - Event binding: you can bind HTML events to C# methods. For example, here is how to handle a button click; the ShowMessage method is called when the button is clicked:
<button @onclick="ShowMessage">Click</button> @code { private void ShowMessage() { Console.WriteLine("Button clicked!"); } } - Binding to lists and iteration: you can use data binding to connect collections of data, such as a list of items, and iterate over them in the UI. In this example, each item in the list is displayed as an HTML list item:
<ul> @foreach (var item in items) { <li>@item</li> } </ul> @code { private List<string> items = new List<string> { "Item 1", "Item 2", "Item 3" }; }
By exploring and experimenting with data binding, you can make your Blazor pages more reactive and interactive. It is a powerful aspect of Blazor that simplifies data handling and improves the overall development experience.
Step 7: add interactivity
Blazor makes it easy to add interactivity to your web pages without writing JavaScript. You can handle user events, such as button clicks or keyboard input, directly in your project's C# code.
Here is how to add interactivity in Blazor:
- Event handling: you can handle HTML events, such as a button click, directly in C#. In this example the ShowMessage method is called when the button is clicked:
<button @onclick="ShowMessage">Click</button> @code { private void ShowMessage() { Console.WriteLine("Button clicked!"); } } - State variables: you can use state variables to keep the application's state and render the UI dynamically based on them. In this example, the state variable is updated when the button is clicked:
<p>Current state: @state</p> <button @onclick="ChangeState">Change state</button> @code { private string state = "Initial"; private void ChangeState() { state = "Changed"; } } - Conditional rendering: you can use @if statements to show or hide parts of the UI based on logical conditions. In this example, the message is shown or hidden depending on the value of the showMessage variable:
@if (showMessage) { <p>Message displayed!</p> } <button @onclick="ToggleMessage">Show/Hide message</button> @code { private bool showMessage = false; private void ToggleMessage() { showMessage = !showMessage; } } - User input and two-way data binding: use input elements to let the user enter data and bind them to C# variables with two-way data binding. In this example, the userInput variable is bound to the user's input and displayed dynamically on the page:
<input type="text" @bind="userInput" /> <p>You entered: @userInput</p> @code { private string userInput = ""; }
Adding interactivity in Blazor is intuitive and powerful. Take advantage of Blazor's declarative, reactive nature to build dynamic web pages without writing complex JavaScript. Explore event handling and interactivity further according to your project's needs.
Step 8: create reusable components
Components are an essential part of Blazor because they let you organise code into reusable units. You can think of a Blazor component as a widget or control that can be used in several parts of the application. Creating components lets you structure your code in a more modular way and encourages reuse. Here is how to create and use components in Blazor:
- Creating a component: to create a component, simply create a new Razor file (.razor) in the "Shared" folder or a dedicated folder. For example, create a file called MyComponent.razor:
<!-- MyComponent.razor --> <div> <h3>@Title</h3> <p>@Content</p> </div> @code { [Parameter] public string Title { get; set; } [Parameter] public string Content { get; set; } } - Using the component: once created, you can use the component in any Razor page by adding its tag as if it were a built-in HTML element. In this example MyComponent is used on the page, passing values for the Title and Content parameters:
<!-- Using the component in a Razor page --> <MyComponent Title="Component title" Content="Component content" /> - Component parameters: components can accept parameters, which are C# properties marked with the [Parameter] attribute. These parameters are used to pass data to the component.
- Component events: a component can also define events that can be handled where it is used. For example, a button component could define an OnClick event, which the page using the component can handle:
<!-- MyButton.razor --> <button @onclick="OnButtonClick">Click</button> @code { [Parameter] public EventCallback OnClick { get; set; } private async Task OnButtonClick() { await OnClick.InvokeAsync(); } } - Simpler reuse and maintenance: using components makes code easier to reuse and simplifies maintenance. If you need to change a component's behaviour or appearance, you do it in one place and the changes are reflected wherever the component is used.
- Communication between components: Blazor supports communication between components through services, events or data shared between parent and child.
By using components you can organise your code more cleanly and promote reuse. It is a fundamental aspect of Blazor that helps manage complex user interfaces and application features effectively.
Step 9: add services
In Blazor you can use dependency injection to add services to your project. Dependency injection is a key concept in .NET that separates business logic from other components, making the application easier to maintain, test and manage.
Here is how to add and use services in Blazor:
- Create a service: you can create a service by writing a class that implements an interface or a base class. For example, create a service to manage user data:
csharp: // UserService.cs public interface IUserService { string GetUserName(); } public class UserService : IUserService { public string GetUserName() { return "John Doe"; } } - Register the service: once created, you need to register the service with Blazor's dependency injection, usually in the Startup.cs file. In this example UserService is registered as a singleton, which means there will be a single instance of the service for the whole lifetime of the application:
csharp: // Startup.cs public void ConfigureServices(IServiceCollection services) { services.AddSingleton<IUserService, UserService>(); } - Inject the service into a component: you can inject the service into a component with the @inject directive. The component then has access to IUserService and can call the GetUserName() method:
html: @inject IUserService UserService <p>Hello, @UserService.GetUserName()!</p> - Use in components: you can use the service in your components to handle complex logic, data access, authentication and more. In this example, the service is used in a Blazor page to display the user's details:
html: @page "/user" @inject IUserService UserService <h3>User details</h3> <p>User name: @UserService.GetUserName()</p> - Service scopes: you can register services with different scopes, such as Singleton, Scoped or Transient, depending on your needs. For example, Scoped creates a new instance of the service for each HTTP request. The choice of scope depends on the specific needs of your service and application:
csharp: // Startup.cs public void ConfigureServices(IServiceCollection services) { services.AddScoped<IUserService, UserService>(); }
Using services in Blazor keeps your code organised, makes dependencies easier to manage and promotes reuse. You can take advantage of the wide range of services offered by .NET or create your own custom services for your application's specific needs.
Step 10: publish the application
Once you have developed your Blazor application, it is time to publish it so that it can be deployed and made available to users. You can publish a Blazor application in several ways, including to a web server, to a cloud hosting service or in containers.
Here are the general steps to publish your Blazor application:
- Configure the application for publishing: make sure the application's settings are correctly configured for production. Check the appsettings.json file for any specific settings and make sure it is set up correctly for the production environment.
- Build the application: build the Blazor application with the dotnet publish command. This compiles the application and prepares the files needed for deployment. The -c Release option specifies that the build should be optimised for production:
bash: dotnet publish -c Release - Deploy to a web server: if you want to deploy the application to a traditional web server, copy the files generated in the bin\Release\netcoreapp3.x\publish folder (or a similar directory) to the server. Make sure the server is properly configured to host ASP.NET Core applications.
- Deploy to a cloud hosting service: if you have chosen a cloud hosting service such as Azure, AWS or Google Cloud, follow the provider's documentation to deploy the application. Many of these platforms offer specific tools to simplify the deployment of .NET Core applications.
- Deploy with containers: you can also deploy the Blazor application in a Docker container. First create a Dockerfile in the root of your project with the instructions needed to build a Docker image, then use Docker commands to build and deploy the container image:
dockerfile: FROM mcr.microsoft.com/dotnet/core/aspnet:3.1 AS base WORKDIR /app EXPOSE 80 FROM mcr.microsoft.com/dotnet/core/sdk:3.1 AS build WORKDIR /src COPY . . RUN dotnet restore "BlazorAppName.csproj" RUN dotnet build "BlazorAppName.csproj" -c Release -o /app/build FROM build AS publish RUN dotnet publish "BlazorAppName.csproj" -c Release -o /app/publish FROM base AS final WORKDIR /app COPY --from=publish /app/publish . ENTRYPOINT ["dotnet", "BlazorAppName.dll"] - Test the deployed application: once deployed, test the application to make sure it works correctly in production. Check the database connection, the handling of static resources and any other production-specific features.
- Monitoring and maintenance: put monitoring and logging tools in place to keep track of the application's performance in production. Check the logs regularly to identify and fix any problems.
Publishing a Blazor application is a crucial step in the development process, and it is important to be aware of the different options available depending on your project's needs. Follow security, configuration and management best practices during deployment to ensure an optimal, secure user experience.
In conclusion
We hope this short guide will kick-start your desire to code in the development environment we at ESSE I recommend most.
Do you need help installing Blazor and starting to program, or just building your application? You know who to ask. Get started today, free of charge, by sharing your questions with us through our contact page.
We look forward to helping you turn your goals into... source code!